Friday, December 25, 2015

Dyed polyfil needle felting

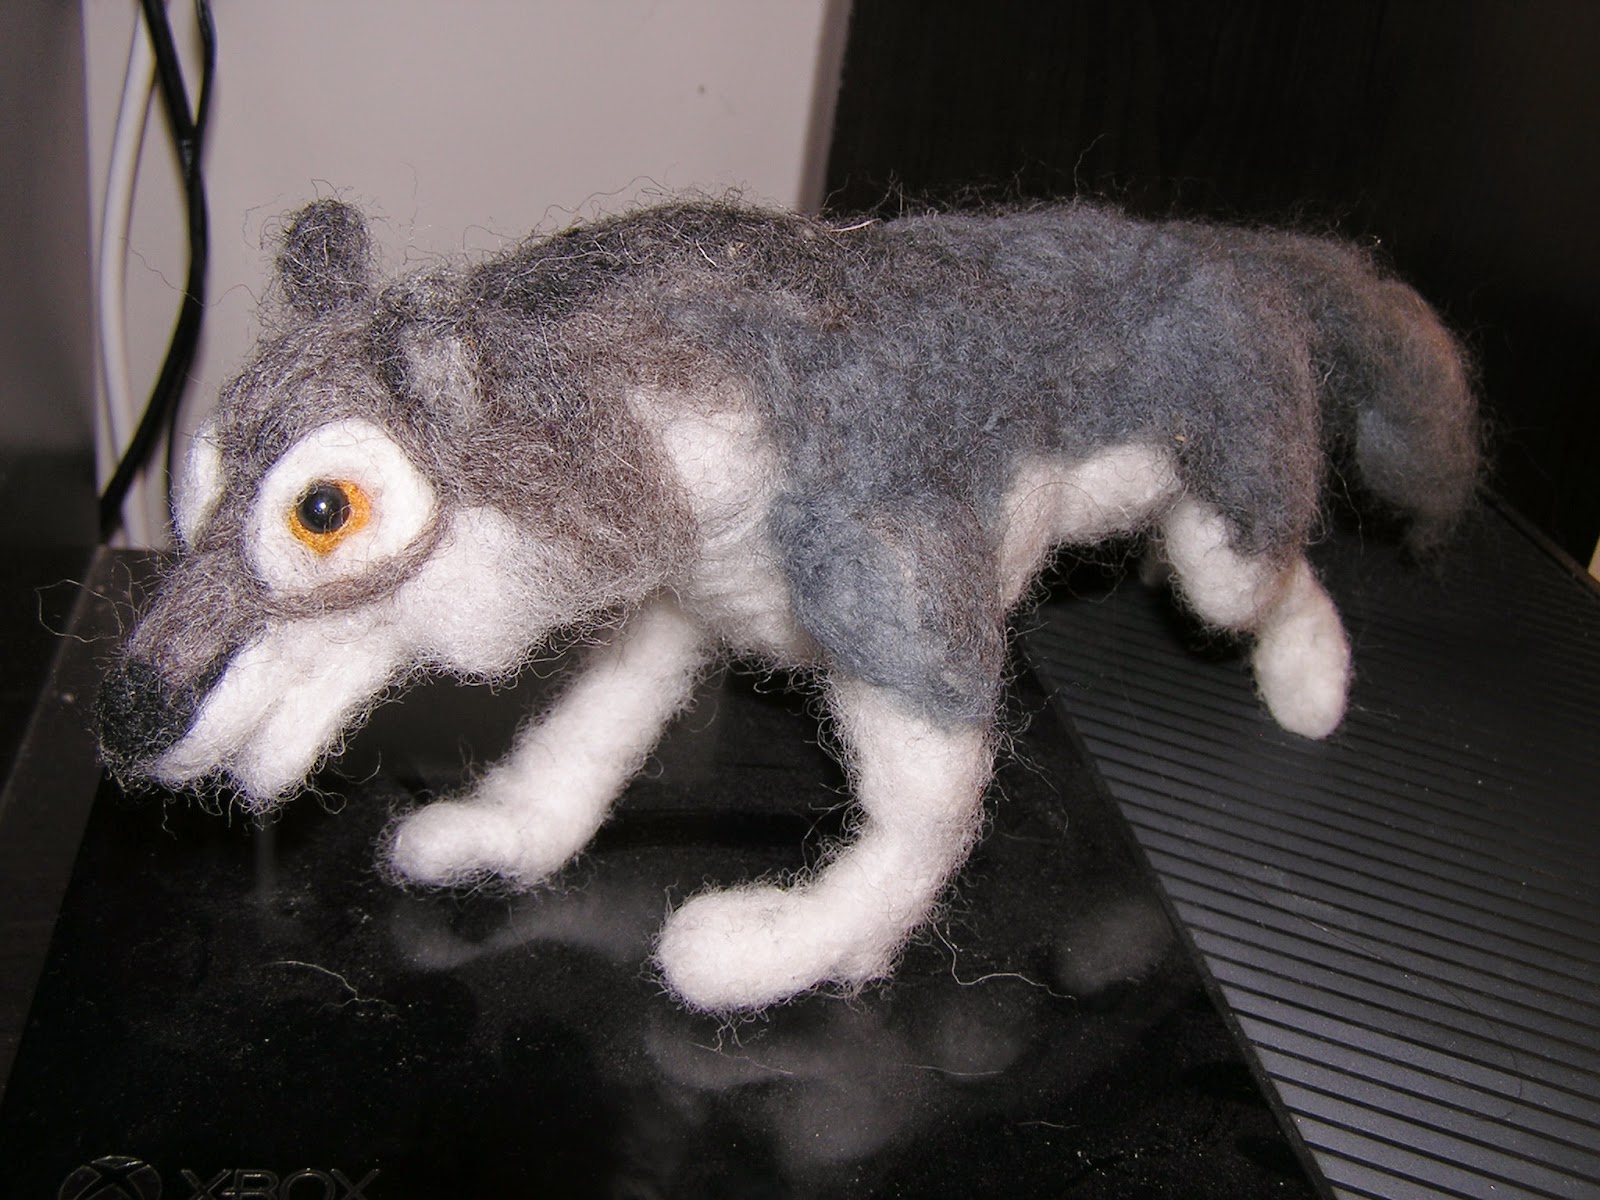
Well this one is almost entirely poly fill I still can't figure out how to get black polyfil the grey is dyed polyfil. I used a reverse felting needle to pull some white fiber through the grey for realism.

Thursday, December 17, 2015

More grey dyed polyfil

Needle felted dyed polyfil grey was the only color I tried. It doesn't felt as well after being dyed. It's more pre matted.

Horse

This horse is polyfil with dyed polyfil grey highlights. Dying polyfil is very smelly. I won't do it again unless I can do it outside. Better to make a poly fill core with wool accents on top. Since dying wool is much easier with kool-aid or egg dye.

Thursday, September 24, 2015

Sunday, May 17, 2015

Felted posing

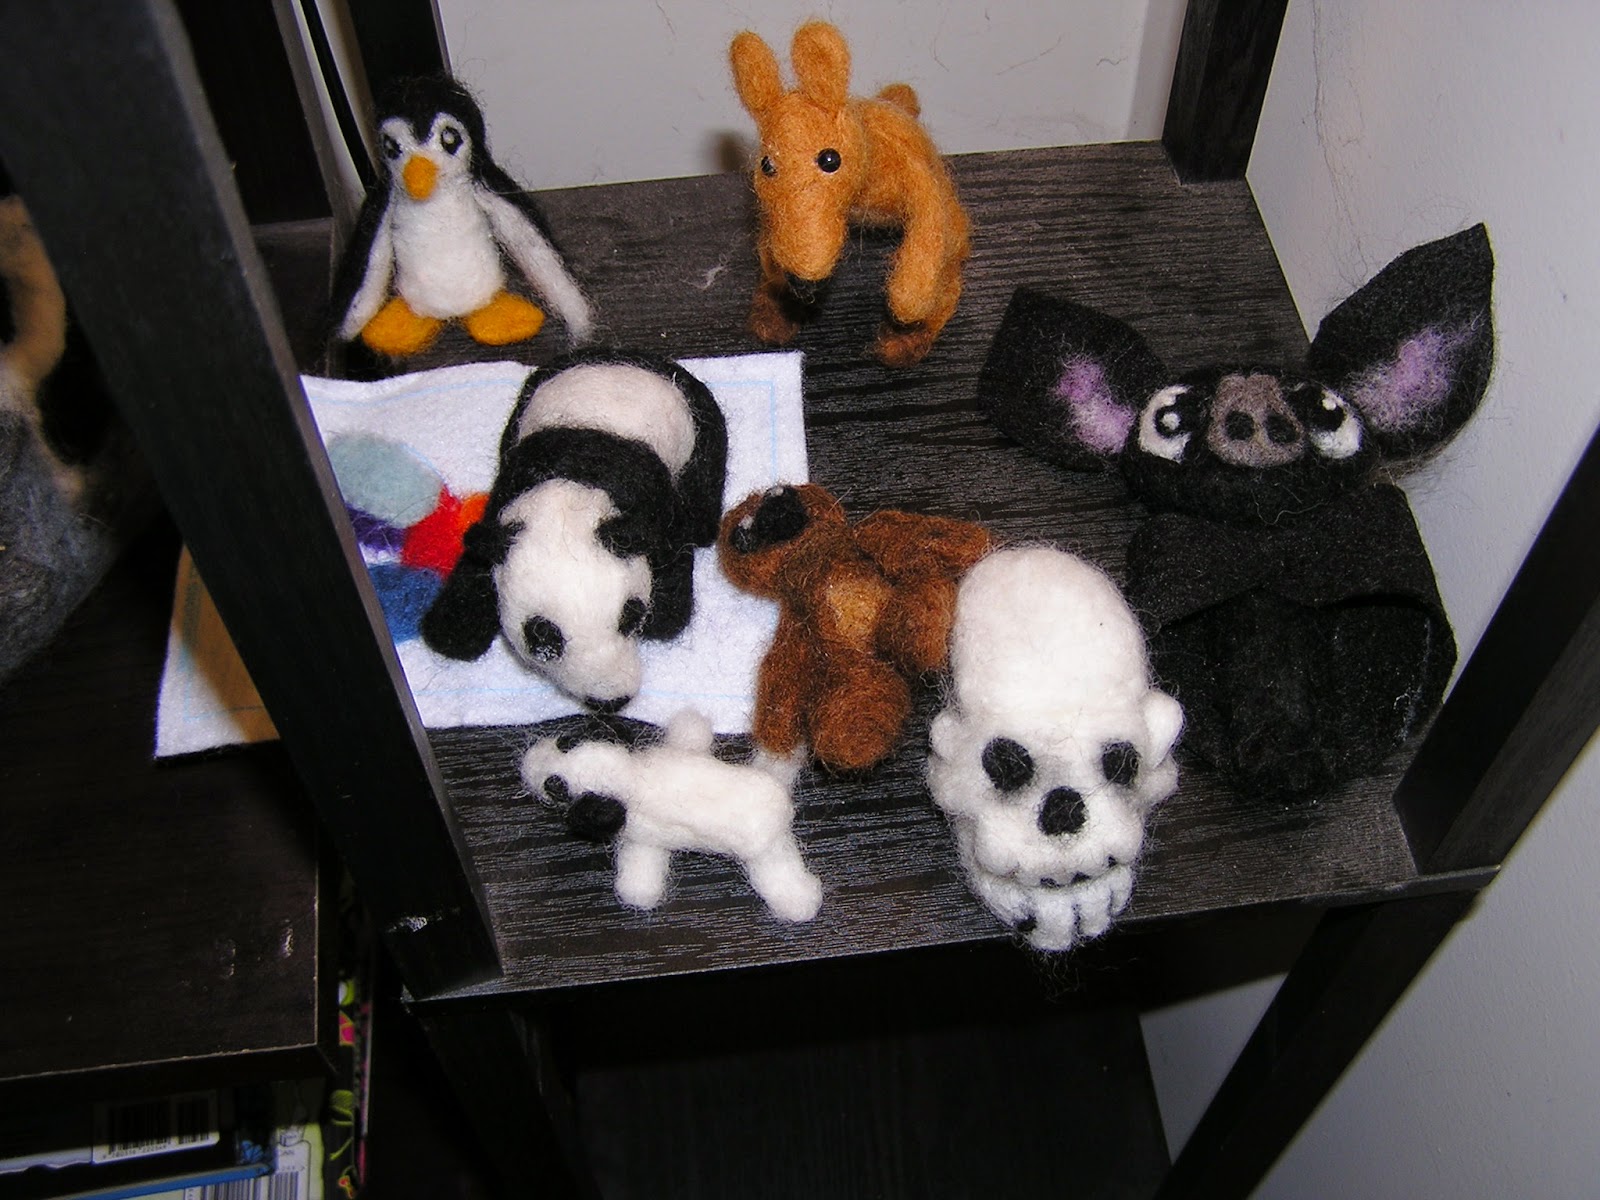
I found with felted mice it is more about the posing than the mouse it self check out Ralph s mouse and friend

Felted polyfil unicorn

Haven't posted in a while been working on a few different projects a few were utter failures and not worth posting.  This felted unicorn worked out pretty well . I used some of sarafina fiber arts pony instructions but that made it a little too far so I had to trim the belly . It is made almost completely of fiberfill I bought 2 pounds of it from Joann fabrics on line. The hooves are wool as I have not been able to try dyeing the poly fil yet.

Sunday, April 5, 2015

Break from felting

Chaucers canterberry tale prologue in middle English.
I was forced to memorize and recite this in high school. It haunts me to this day.

Whan that aprill with his shoures soote 
The droghte of march hath perced to the roote, 
And bathed every veyne in swich licour 
Of which vertu engendred is the flour; 
Whan zephirus eek with his sweete breeth 
Inspired hath in every holt and heeth 
Tendre croppes, and the yonge sonne 
Hath in the ram his halve cours yronne, 
And smale foweles maken melodye, 
That slepen al the nyght with open ye 
(so priketh hem nature in hir corages); 
Thanne longen folk to goon on pilgrimages, 
And palmeres for to seken straunge strondes, 
To ferne halwes, kowthe in sondry londes; 
And specially from every shires ende 
Of engelond to caunterbury they wende, 
The hooly blisful martir for to seke, 
That hem hath holpen whan that they were seeke. 

Wednesday, April 1, 2015

Opportunity Pirate Fest Crew

Opportunity Pirate Fest Crew


volunteer at this fest to get free admission. this is the cool boat kids will make at the raingutter regatta.

Sunday, March 29, 2015

Needle felted giraffe tips

Ok so I learned a lot from this experiment. I was very intimidated by having to add all the spots. three lessons I learned.
First if you are going to apply spots directly to the giraffe then you need to be sure it is very firm before you start if it is still mushy the spots go in and the space between them will be too wide when finished. one option is to create a sheet of spots using the brush and multi-needle punch tool to make the spots flat and even.


The other thing I tried was to make the spots angular like in real life I feted a sheet of brown with the multi tool and brush pad. then I cut with scissors (heaven forbid) the sheet into the angular shapes and felted them one I really like the control this method gave me.
 
I also had to pull off the horns cut them smaller and place them closer to the eyes as they were too far back. That cutting worked well also.


Friday, March 27, 2015

Fixing mistakes in a needle felted piece

I read a lot of posts and most of them said do not cut your felted sculptures that you should always pull it apart so that isn't always  possible and you know what I don't think its even necessary I've cut my things apart many times and I've been able to cover it up and make it look just fine so I don't know what they are saying when they say don't cut it I've been just fine by cutting my things especially when I make something too skinny I cut it up the middle shove a ball inside and then seal it back-up seems to work just fine for me.

Saturday, March 21, 2015

sculptural effects with polyfil felting

I really like needle felting with polyester stuffing i call it polyfil. it is a pain that it only comes in white but I have been able to get faster and better sculptural effects. it is probably hard to see but i even had some feather effects on the owl chest and of course his face. i suspect i am either using the wrong wool or i am just not poking it long enough. 
I should have a better idea if it is me or the wool once i try my kool aid dyed wool. this is the first sculpture with a glass pebble eyes it was kind of opalescent i painted the back black and yellow its kind of a neat effect but will take a lot more practice to get right any small imperfection is multiplied by the magnification of the water drop shape. This is for my mom. I made my mother in law a dolphin. I am going to bring my felting stuff to try and get my mother or sister interested in felting with me my mom likes sculpture with clay and my sister is a crochet fanatic so they are good candidates.


Armatures what I learned

I like to use armature for the big stuff. I Learned a lot from sarafina fiber arts you tube videos. i like the way she anchors the legs. I have applied that technique to some of the other stuff I have felted. I want my felted animals to be to scale at this point i may want to do some caricatures of animals in the future but for now I would like to keep them accurate. So i have been measuring pictures in books or on my kindle in cm then translating them into inches this is the measurements I am going to use for the giraffe .


Even though koi whch is all polyfil except the black spots does not have an armature I still measured  a koi picture the the picture was 5 inches but the final koi is 10 inches I marked where each fin started and ended to get it to look real.  


This is the wrapped armature for a big cat i am working on.
I hope to post the giraffe when it is done.


coloring polyfil for felting


ok so i read on the Internet that polyester is very hard to dye and regular dyes and kool aid does not work but that fabric crayons were the right kind of dye and work on polyester fabrics. I had some fabric pastels i think they are softer than fabric crayons. they way fabric crayons work is that you draw a design on a piece of paper and iron it on to the fabric. with the pastels you probably draw on the fabric then iron to make it permanent . I tried drawing on paper and ironing it on it did not work  probably because of being pastels it just absorbed into the paper I tried drawing on wax paper instead thinking it would not soak in but it did not work well either. so I tried rubbing it directly on the polyfil it seemed to work but was really messy and I thought it might stain my hands so I used a knife to put shavings in the poly fill and then apply the iron with wax paper in between, ti worked but i had to keep puling and mixing in white with the orange a few pieces got really dark and stiff so I don't thing this was the best idea. just rubbing it around on the heated poly fill mixing it by pulling and re-ironing seemed to do ok. you can see the results below. I was surprised that even though my fingers turned orange it washed off with water it seems the heat is the key to setting it. Of course the soapy water turned colors so it made me wonder if that would be a way to get the dye to spread more evenly.
If i do mix it with soap and water I will probably microwave the polyfil to set it as I am not sure how to iron it if it was wet. more experiments to come.


Sunday, March 15, 2015

better Pictures of felted scultures


I have been trying to take pictures of my felting to share it never looks as good in the photos as is does in real life. the photo above is the first I took in my kitchen the photo below is one I took with a neutral grey fabric backdrop.  it did help some I think. A lot of folks take pictures of their stuff outside  I will try that a next but I think my phone camera is just not that great I will try my real camera as well. I think if I look at more felting examples on pinterest I can get some more ideas to try.


koolaid wool dying

Now that my wool came I tried dying it. The wool came as a plain off white color to start. I used the instructions from this website http://dyeyouryarn.com/kool-aid.html. we used 1 pack cherry and 1pack tropical punch 16oz of water to 2 oz of wool.
this is how it cam out.
.
I think it came out well I am looking to make a cardinal or red dragon from this.
The other batch did not go as well since we started with purple kool aid and added some green from fizzy bath color tabs. it seem really grey and I wanted brown so we added a pack of orange kool aid after we did not mix it well so some inner parts di not get the orange . it is a cool effect and looks fairly natural but I don't think I will make the mistake of adding a color after the wool is already sitting in another color.
  it is kind of tye dyed. eventually I am going to try to color small amounts of polyfil with fabric crayons and an iron.


shaping with the needle

I finally got my wool order 2lbs is a lot when the most you can get in the store is 4oz. So I immediately set to felting. Having worked on polyfil for the 2 weeks while I waited I thought I would be able to compare working with wool versus polyfil.
The wool I found not as easy to shape as the polyfil. it seems the polyfil gets firmer faster and so I like working with it. The wool does not seem to firm s much and so doesn't hold shape as well with out lots of building up. I read on one of the many felting blogs that it may take 8-15 hours of stabbing to firm up a wool sculpture. I do not have that amount of time for felting. this make polyfil superior in my eyes. Now I need to figure out how to blend the sculpture of polyfil with the color of wool. 
these kitty paws are felted of polyfil.

Wednesday, March 11, 2015

Needle felted weasel on armature all poly fill


Ok here is the result of the polyfil on armature needle felting experiment.
this is my felted ermine.

Monday, March 9, 2015

Tutorials

This is one of my favorites so far. I have to thank sarafina fiber art YouTube tutorials it helped me a ton while making this.

Poly fil on an armature

Success here is the base coat of pilgrim on my weasel armature. Not much different from a base coat of core wool. It tends to come out of the babe in shorter lentgs than core wool so it takes a little longer to wrap . I think if I split the bag up the side I can get longer lengths. Will post finished ermine soon.

Sunday, March 8, 2015

Dyeing polyfil

Well I still haven't gotten my wool so I haven't experimented with lol aid dyeing yet. But the last time I tryed with the color tabs from my daughters science kit the wool took the dye and the polyfil did not. Reading what it takes to dye polyester scares me. But it said you can use fabric cayons and heat not sure how to translate that into large amounts with out burning something but is intriguing for small amounts I Wil let you know how it goes if I can find. My fabric crayons haven't used them in years. But loved them when I did . I think I will start with strips.

Saturday, March 7, 2015

Buddy friend

My daughter wants a bird for a pet this felted bird is much less messy.

Friday, March 6, 2015

silky soft polyersterfiber bunny

This is my newest felt project. this little bunny is fully polyfil with pony bead eyes.
he could use more work but we had a snow day so I whipped him up to further test my polly fill theory. I originally had him stating up tall but wanted to make him kind of cuddled up so I cut of his head to shorten his neck and felted it back on with some extra poly fill and you can t even tell he got fatter so then his head looked small so I cut him between the ears and added some brain matter to beef up the head and nor it is more proportional . It seems that poly fill is pretty forgiving as well it does get hard but I am  not sure with out more wool experiments which I prefer for shaping feet.

 more to come...

Thursday, March 5, 2015

Ok so polyfill felting. most of the references i could find on the web were from before 2008. I think it is possible that the polyfill i found was created after that  but it works!!
It felts almost as good as wool. here is the cat I made....


 I was able to even shape the paws it seemed even better then wool in that respect.


This is the brand I am using I also made a little white mouse with it and it does get firm fairly fast. I am going to keep experimenting with it. as wool is pretty expensive. I think the biggest issue will be adding color. I was able to felt over
 this cat is wool over poly fill. no armature in this cat or the big whit one. I really wanted to try the big cat with more realistic eyes but my daughter really wanted the cute eyes.


I think i will make some more white critters and when my new wool gets here I will experiment with dying wool  and maybe ways to color the polyfil with pastels or even dye though i doubt it will work.
I have read a lot of blogs and boards and seen videos where they say that polyfil is not good for felting and its only use is for a core material on large sculptures.
I read that if you are frustrated as a new felter it may be because you need to felt big before you can felt small so i tried this horse. and i loved it. bigger is better!


It did make me wonder for big things how much polyfill could i use and since it is so much less expensive could i just use poly fill if it was a whit critter? see my next post for details.


here are some of my early experiments....
I love that felt is so forgiving.


This wolf was remade 3 times. I learned a lot about types of wool. like not to use superwash. it wasn't labeled as that but since it is so smooth and hard to felt i figure it must be.


I also learned about armatures and how important it is to wrap them in pipecleaners down to the toes.
I had to cut him open and add the pipe cleaners and re wrap him. That is what convinced me that the reason I liked felting so much is because it is like clay sculpture and taxidermy combined. i really enjoyed taxidermy in college.


this is my next sculpture it will be a panther.


ok real start

Ok I am really starting now. I always said I would never cave to face book then when i checked my husbands account more then he did he made me get my own. I am much more of a lurker then a poster i love to keep tabs on my friends new and old but I am not good at sharing. Then i thought i would try out pinterest and that is where i discovered felting. I started with one or two boards and now I have 13 boards 3 have to do with felting.
Just before Christmas 2014 I bought a kit from amazon for this cat...


an although i am not particularly proud if it as it is under done. it was so much fun and provided me with my first needle. I had to immediately get more supplies. I bought a brush and multi-needle tool before i even knew what they were for.
 At this point i would probably buy them now that i know what they are for. they are both really great for flat needle felting but not as helpful for 3d sculpture. I do use then for ears and other flat shapes so not as great for other stuff. my best purchase was the set of needles 38s 38t 36t 40t. it was good to see what each could do.


After the first kit i did a lot of experiments based on pins I collected boards I read and YouTube videos I watched. Special thanks to Sarafina fiber arts and her you tube tutorials especially for armatures.